
How to Polish 3D Printed Parts for a Mirror-Smooth Finish
In today’s fast-evolving manufacturing landscape, 3D printing stands out for its unmatched flexibility and customization capabilities. It empowers designers and engineers to rapidly transform concepts into physical models, with applications spanning automotive, medical, and aerospace industries. However, raw 3D printed parts often have rough surfaces, visible layer lines, or imperfections that fall short of professional-grade requirements. This is where post-processing becomes essential. Through targeted surface treatments, you can dramatically enhance a part’s aesthetics, mechanical performance, and functionality. This article explores several proven post-processing techniques to achieve a smooth surface, offering practical insights for beginners and professionals alike.
Why Do 3D Printed Parts Need Post-Processing?
The essence of 3D printing lies in layer-by-layer fabrication, whether using FDM (Fused Deposition Modeling), SLA (Stereolithography), or SLS (Selective Laser Sintering). This process inevitably leaves microscopic layer lines or granular textures. Industry data shows that untreated 3D printed parts typically have a surface roughness (Ra value) of 10-50 microns, while post-processing can reduce this to below 1 micron, achieving near-mirror finishes.
Post-processing serves multiple purposes: removing layer lines, smoothing surfaces, improving corrosion resistance, refining dimensional accuracy, and preparing parts for painting or assembly. The choice of method depends on the material (plastic, metal, or resin), part complexity, and budget. Let’s dive into the most effective techniques.

1. Manual or Mechanical Sanding: A Simple Yet Effective Smoothing Method
Sanding is the most accessible and cost-effective post-processing technique, particularly for plastic and resin parts. It physically removes surface imperfections to create a uniform, smooth finish.
Start with the right tools: coarse sandpaper (80-120 grit) for initial layer line removal, progressing to finer grits (400-2000) for polishing. Manual sanding suits small parts, while electric sanders or vibratory tumblers can speed up batch processing.
Steps:
Clean the part: Use alcohol or a mild cleaner to remove print residues.
Coarse sanding: Gently sand along layer lines to avoid deformation.
Intermediate sanding: Use wet sanding with water to reduce dust and enhance smoothness.
Fine polishing: Apply polishing compound with a cloth for a glossy finish.
Key tip: Monitor part dimensions during sanding. For parts with tight tolerances (e.g., ±0.1mm), leave a 0.2-0.5mm margin to prevent over-sanding, which can weaken or deform thin-walled parts. Sanding is labor-intensive but versatile, making it ideal for DIY enthusiasts.

2. Sandblasting and Shot Peening: Professional Surface Enhancement for Metal Parts
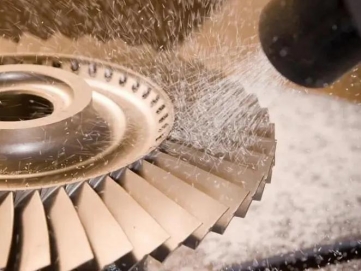
For metal 3D printed parts, such as aluminum, titanium, or stainless steel, sandblasting and shot peening are highly effective. These methods use high-velocity particles to refine surfaces.
Sandblasting employs abrasive media (e.g., aluminum oxide or glass beads) to remove oxidation and smooth rough textures, ideal for aesthetic improvements and coating preparation. It handles complex geometries without damaging internal structures. Shot peening, on the other hand, uses metal shot to induce compressive stress, boosting fatigue life and crack resistance, commonly used in aerospace components.
Equipment: A professional sandblasting cabinet or shot peening machine is required, with protective gear to prevent dust inhalation. Control parameters like pressure (50-100 psi) and media size (100-300 mesh) to avoid surface damage.
Compared to sanding, these methods are faster (minutes per part) and automated but require higher initial investment. For example, an automotive supplier reduced surface roughness from Ra 20 microns to Ra 5 microns using sandblasting, enhancing product appeal.
3. Vibratory and Tumbling Polishing: Ideal for Batch Processing
For processing multiple parts simultaneously, vibratory and tumbling polishing are excellent choices. These methods use mechanical motion and abrasive media (e.g., ceramic beads or plastic pellets) to create friction and achieve uniform surface finishes.
Vibratory polishing places parts in a vibrating container with media and lubricant, using high-frequency vibrations (thousands per minute) to remove burrs. Tumbling polishing, suited for larger parts, occurs in a rotating drum. Both can incorporate chemical additives to accelerate the process, with treatment times ranging from hours to a day.
Benefits: Efficient for batch production and complex shapes, delivering consistent gloss. The drawback is limited effectiveness for intricate internal channels. Rinse parts thoroughly post-polishing to remove residual media.
In medical device manufacturing, these techniques are used for 3D printed implants to ensure sterile, smooth surfaces that reduce infection risks.

4. Vapor Smoothing and Solvent Dipping: Chemical Routes to a Glossy Finish
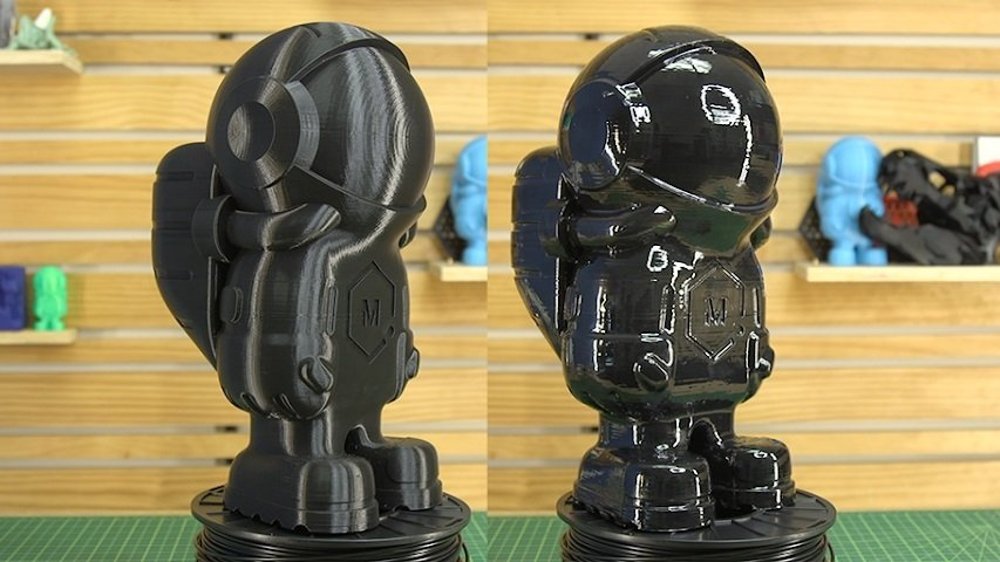
Vapor smoothing is a non-contact chemical process ideal for thermoplastics like ABS or ASA. It exposes parts to solvent vapors (e.g., acetone), causing the surface to slightly melt and reflow, creating a glossy finish.
Process: Heat solvent in a sealed chamber, suspending the part for minutes to hours. An alternative is solvent dipping, immersing parts directly, but time must be controlled to prevent over-dissolution.
This method is fast (5-30 minutes) and produces a mirror-like surface but isn’t suitable for all materials (e.g., PLA may deform). Safety note: Operate in a well-ventilated area to avoid solvent vapor exposure.
Compared to physical methods, vapor smoothing is more uniform but may slightly alter dimensions, making it ideal for non-precision applications like prototypes or decor.

5. Epoxy Resin Coating: Sealing and Strengthening
Epoxy resin, a reactive polymer, is applied as a coating or infiltrant to 3D printed parts. It fills micropores, creating airtight, waterproof surfaces while enhancing heat and chemical resistance.
Application: Brush, spray, or vacuum-infiltrate the resin. After curing, the surface is smooth and durable, ideal for functional parts like pipes or housings.
Pro tip: Sand the part before applying epoxy for optimal results. Use low-viscosity resin for even coverage and follow curing times (typically 24 hours).
6. Hybrid Manufacturing: Combining Additive and Subtractive Techniques
Modern manufacturing is embracing hybrid approaches, integrating 3D printing (additive) with CNC machining (subtractive). Post-print milling or turning precisely removes rough layers, achieving high-precision surfaces.
Hybrid machines, combining laser melting and CNC, can reduce production cycles by over 30%, ideal for high-end applications.
Conclusion: Elevate Your 3D Prints with the Right Post-Processing
With these techniques, you can transform rough 3D printed parts into professional-grade products. The key is selecting the method based on material, purpose, and budget while prioritizing safety and precision. Start with small-scale tests to refine your process. If your business offers 3D printing services, mastering these techniques can set you apart.
This post is also available in:


Leave a Reply
Want to join the discussion?Feel free to contribute!